Create your art work

All my art work is done in either Adobe Photoshop or Illustrator (or both.) Above is the art for a custom piece that I did from the photograph on the left. It's been sized and is ready to print on to PNP blue transfer paper. The art work has to be black and white - no shades of gray.
Cut and prepare the brass sheet

 Ferric chloride will etch brass and copper, I use brass because it's a bit cheaper. 20 gauge is plenty thick, and it's available at many hardware and hobby stores, and of course online. KC Engineering makes it in many sizes. After I cut it with my jeweler's saw, I clean it with Penny Brite copper cleaner and 220 grit sandpaper. Comet cleanser also works for this, just not quite as well. Clean metal is critical, water should sheet off the surface. If it beads up it's not clean enough yet. Dry the clean metal with a clean cloth or paper towel.
Print on to the transfer paper
 I use press-n-peel blue transfer paper for my resist. It's available by the sheet at Whole Lotta Whimsy or by the package at Techniks. You have to use a toner based copier or laser printer to print your art, inkjet printers don't work. I have an inexpensive desktop laser printer that works great for this. I just make sure the toner cartridge is still printing very black. Since the paper is expensive, I just print what I need at the top of my document, that way I can trim the paper and keep running it through. You can also draw right on your brass to make the resist - I find oil based black markers hold up the best.
The tricky part
 Now for the most troublesome part of the entire process, transferring the image from the pnp paper to the brass. This is done with an iron. Here in the US, all the irons have an auto shut off feature, unless you get an expensive "professional" model, which I finally did. The temperature of the iron is very important and you won't get a good transfer if it's too hot or not hot enough, and make sure the steam setting is off. I've found 275 farenheit works very well. I used to use a digital meat thermometer to monitor the temperature of my auto shut off iron. How long you need to apply heat varies on the size of the metal and the amount of large black areas in your art. This part will require some experimentation on your part to get good results, so stick with it even if it doesn't go well at first! The pnp instructions recommend 275 - 325 degrees, and 1.5 to 4 minutes. If the image doesn't transfer well, simply scrub it off with sandpaper and whatever cleaner you're using and try again.
 You can carefully peel up a corner and check the transfer - if it's spotty give it some more time. Large areas of black can be difficult, but you can touch them up with an oil marker or a sharpie.
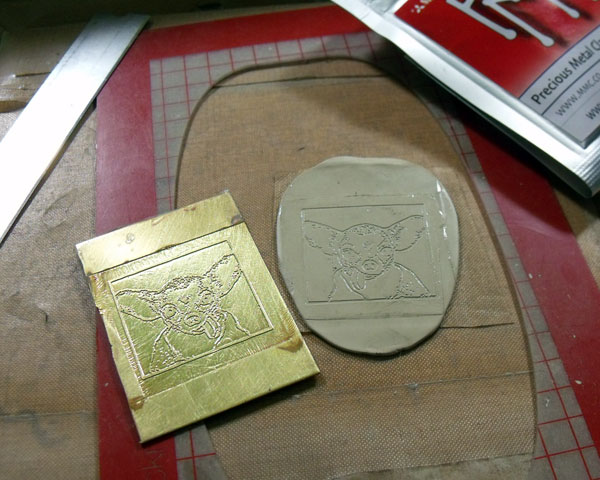
 Success! All the black has transferred from the paper to my brass sheet. The black will resist the etchant, resulting in raised areas where ever the resist is. I've taped the back and sides, which will also resist the etchant.
The actual etching
 I pour the Ferric Chloride about 3/4 to 1" deep in my glass dish. I run a long strip of tape over the back of the brass and suspend it in the liquid face down. You want it face down so the etched metal falls away. They don't have to be immersed, just fully in contact with the liquid. I use fresh solution every time and leave it in for 50 minutes to an hour. I do a lot of etching so I buy my Ferric Chloride by the gallon here, but you can get smaller bottles of it at Radio Shack - they call it PCB etchant. It's used for etching computer circuit boards, so if you're outside the US try looking for it at electronics supply stores.
 You can check the progress, and yes, I should be wearing gloves. The longer you leave it in, the deeper the etch will be. I gently shake the dish to agitate the liquid every 10 minutes or so. This helps to get rid of air bubbles and makes for a smoother etch. You can try not agitating it to see the different results. After an hour the resist will start to break to down, especially fine lines, so I rarely leave it in longer than that. Once it's done I carefully remove the brass and rinse it, then I scrub the resist off with Penny Brite and my sandpaper.
The end result
 Here's my newly etched sheet and the finished piece.
14 comments:
Awesome tutorial Sue! Can i link to it?
Catherine
wow - so amazing!!! I had no idea your process was so cool - than again i know nothing about jewelry. thank you for sharing!! I enjoyed reading it.
Thank you so much for making this tutorial! I have dabbled in acid etching, but haven't tried the pnp paper yet. My biggest problem has been finding a resist that works well. I'll have to try the oil based paint marker. I've had better success with etching copper than I have with silver. I forget the name of the acid used to etch the silver, but it eats through my resist half the time, and doesn't etch evenly. seems to almost have valleys running through the etched part, if that makes sense.
Great tip to etch upside down as well. That may be part of my problem with the silver. Anyway, just wanted to thank you!
Sue, this tutorial is awesome! Thank you for demystifying etching for all of us. I have read books on it, but with this tutorial I feel brave enough to try this soon. :)
Nicely done, thanks for posting. I've used that paper, but not for a long time, great reminder. Riki
Thanks for posting this! I always wondered how it works. Looks rather fun. What do you do with the spent etchant?
so helpful!
Thank you Sue !
I love your post.
I use this technique too and I really love it ! ;D
Thanks so much Sue, something I'm definitely going to attempt in the near future!!
Sue, You are really very kind to post such super helpful tip for etching. I have been wondering on how to do it as i have plenty ideas but just need the actual demo. All metal clay artist will be happy to see them!! Thank you for sharing^^
This is so cool, Sue. Thanks for this little tutorial. I wanted to make a pendant for my girlfriend's birthday but I have no idea how. I don't wanna buy one 'coz I want it to be personal. And the material I have in mind is brass sheet. Suppliers who are friends with my dad have already given me samples. A brass manufacturer advised me to use thin metal for starters.
Hi Lawrence,
Brass is easy to work with and inexpensive (compared to silver) and if you want to etch it you can even just draw on it with an oil based marker. The area you draw will be raised. .032" is a nice thickness for a pendant.
Thank you SO much for the tutorial Sue. I am very new to metal clay and once I get a bit more skilled I want to try this.
Can you tell me what type of patina you use to antique your pieces? I have tried Black Max and Liver of Sulfur and your results are so much more finished than mine. I end up with black spots where I want pure silver.
Do you use a tumbler? Sanding pads? Jewelry cloth? Magic wand? ;)
Thank you again. Your work is beautiful!!!
I remember doing this process in school!! Loved it , and you can do so much with it!
Post a Comment