Tuesday, October 4, 2011

And now for something completely different


I made this last weekend at Art is You in Petaluma, an art retreat. I was signed up for 3 1/2 days of workshops, but was so busy with making jewelry that I could only attend one. It was a tough choice, but I decided to forgo the jewelry making workshop with Thomas Mann (seeing as I make jewelry 7 days a week as it is) and I attended the Michael deMeng workshop, Dr. Xray's portrait.

Using transparancies, photos, found objects and Michael's fantastic aging techniques, this is what I came up with. I started off with an old photo that I took in Uganda (which had been printed on watercolor paper via polaroid transfer), a transparency of the photo, a bank receipt from Cairo and a deep frame. It was really fun to do something totally new and different, and I hope to do more workshops with him next year. Click on the photos for a much more detailed view.


And since we artists have to support each other,
I came home with this amazing piece of Michael's.


Check out Michael's blog here. His books are great, and if you ever
 have a chance to take one of his workshops, do it! You won't regret it.

Monday, March 28, 2011

Old work, new direction


I made this piece almost 20 years ago! It's huge, about 2.5" in diameter (65mm) and the cost of the silver alone would be well over $100 these days, though back then it was probably $10 - $15. It's totally fabricated from sterling sheet, I sawed, I used my pitch bowl and repousse' to give the cheetah form, I chased the details in, and did a whole lot of soldering. Phew! I didn't keep track of how long it took but it was a considerable amount of time.

I've been wanting to do some personal pieces lately, so I've been looking at my work from the olden days, when my livelihood wasn't dependent on selling my work. I've always been fascinated with dioramas and boxes, and much of my older work reflects this. I've been kind of stuck as to what I want to do though, because while I'm sketching and pondering my designer voice invariably takes over and beats the poor artist voice back into submission. Doing this for a living has really changed my creative process. Not that it's a bad thing, I just approach it very differently than I used to and I'm finding it difficult to switch gears.

My friend Lora Hart, teacher and jewelry artist extraordinaire, has recently started offering mentorials on her Etsy shop. I figured she might offer a good perspective on my dilemma so I decided to give it a try. I'm very happy that I did. She offered me some really excellent advice and thoughtful insights and I'm feeling unstuck and ready to create some things just for the sake of creating now - yay! I highly recommend her! You can find her shop here: http://www.etsy.com/shop/LoraHart

I've already started on my first personal piece, I'll post it here when it's done.

Sunday, March 20, 2011

Custom hawk start to finish


I did a custom piece awhile back for someone who wanted to see my process,
so I took a few photos along the way.

 I started with her hawk photograph.

I created this black and white artwork from the photo.


Then I printed the artwork onto special paper and transferred it with 
heat to a brass sheet that has been cleaned and sanded in
preparation for etching.


I etched the brass and used it to make an impression in
my precious metal clay.


I fired the piece in my kiln at 1650 degrees for 2 hours and out came
a pure silver hawk. Here it is finished and ready to wear.

Tuesday, March 1, 2011

A little Photoshop goes a long way...


Taking good product photos is probably the hardest thing about selling your work online. I use a Fuji Finepix  S1500, which is inexpensive and is in between a point and shoot and an SLR. Honestly though, my photos are not so hot right out of the camera (helpful hint: don't have your photo studio in a room with pale green walls if you can help it!) but I'm fortunate in that I used to do a lot of product photo editing in my former day job, so I'm quite well versed in Photoshop. I use two daylight balanced bulbs and a piece of white nylon fabric as a light tent to diffuse them.

The top photo has only been cropped, while the bottom photo has had cropping, rotation, skewing, levels and curves adjustments, hue/saturation adjustments, dodging, burning, sharpening and blurring. It sounds like a lot of work, but for me it's faster to do the work in Photoshop than to fuss with the actual photo taking. I recommend taking an online Photoshop class to really get a good feel for it. I did several semesters online at my local JC and it was well worth the time.

Monday, February 7, 2011

Happy 100th birthday grandma!


My wonderful grandma Paulina will be 100 on Friday February 11th! She was born in a small village called Triebswetter, in what was then Austria Hungary and is now Romania. She came to the US in the 30's with my grandpa and has lived in the Chicago area since, except for a brief move to Fargo, North Dakota. She has 2 daughters, 5 granddaughters, 7 great grandchildren and 1 great, great grandchild. She is an amazing woman and we are all blessed to be a part of her family! Happy birthday grandma! We love you!

Thursday, December 16, 2010

Renegade Holiday Fair San Francisco

It's been a very busy 6 weeks here at the Lulu Bug studios, and for a bit of icing on the madness cake I'll be selling at the Renegade Holiday Fair in San Francisco this weekend, Dec. 18 and 19. If you go please stop by and say hi! I'm sharing a booth with my sister, who's work you can see here: http://www.etsy.com/shop/rawartletterpress

Please note that it's not at Fort Mason, it's at the Concourse Exhibition Center’s East Hall, 620 7th St. You can get all the info and directions here: http://www.renegadecraft.com/holiday-sf
Back to work now, I've got a lot to do!

Tuesday, October 26, 2010

How to etch with Ferric Chloride

I use brass plates that I've etched with my own art work to imprint my silver metal clay. Here's a very quick tutorial on how I do it.

Create your art work


All my art work is done in either Adobe Photoshop or Illustrator (or both.) Above is the art for a custom piece that I did from the photograph on the left. It's been sized and is ready to print on to PNP blue transfer paper. The art work has to be black and white - no shades of gray.


Cut and prepare the brass sheet


Ferric chloride will etch brass and copper, I use brass because it's a bit cheaper. 20 gauge is plenty thick, and it's available at many hardware and hobby stores, and of course online. KC Engineering makes it in many sizes. After I cut it with my jeweler's saw, I clean it with Penny Brite copper cleaner and 220 grit sandpaper. Comet cleanser also works for this, just not quite as well. Clean metal is critical, water should sheet off the surface. If it beads up it's not clean enough yet. Dry the clean metal with a clean cloth or paper towel.

Print on to the transfer paper

I use press-n-peel blue transfer paper for my resist. It's available by the sheet at Whole Lotta Whimsy or by the package at Techniks. You have to use a toner based copier or laser printer to print your art, inkjet printers don't work. I have an inexpensive desktop laser printer that works great for this. I just make sure the toner cartridge is still printing very black. Since the paper is expensive, I just print what I need at the top of my document, that way I can trim the paper and keep running it through. You can also draw right on your brass to make the resist - I find oil based black markers hold up the best.

The tricky part

Now for the most troublesome part of the entire process, transferring the image from the pnp paper to the brass. This is done with an iron. Here in the US, all the irons have an auto shut off feature, unless you get an expensive "professional" model, which I finally did. The temperature of the iron is very important and you won't get a good transfer if it's too hot or not hot enough, and make sure the steam setting is off. I've found 275 farenheit works very well. I used to use a digital meat thermometer to monitor the temperature of my auto shut off iron. How long you need to apply heat varies on the size of the metal and the amount of large black areas in your art. This part will require some experimentation on your part to get good results, so stick with it even if it doesn't go well at first! The pnp instructions recommend 275 - 325 degrees, and 1.5 to 4 minutes. If the image doesn't transfer well, simply scrub it off with sandpaper and whatever cleaner you're using and try again.

You can carefully peel up a corner and check the transfer - if it's spotty give it some more time. Large areas of black can be difficult, but you can touch them up with an oil marker or a sharpie.

Success! All the black has transferred from the paper to my brass sheet. The black will resist the etchant, resulting in raised areas where ever the resist is. I've taped the back and sides, which will also resist the etchant.

The actual etching

I pour the Ferric Chloride about 3/4 to 1" deep in my glass dish. I run a long strip of tape over the back of the brass and suspend it in the liquid face down. You want it face down so the etched metal falls away. They don't have to be immersed, just fully in contact with the liquid. I use fresh solution every time and leave it in for 50 minutes to an hour. I do a lot of etching so I buy my Ferric Chloride by the gallon here, but you can get smaller bottles of it at Radio Shack - they call it PCB etchant. It's used for etching computer circuit boards, so if you're outside the US try looking for it at electronics supply stores.

You can check the progress, and yes, I should be wearing gloves. The longer you leave it in, the deeper the etch will be. I gently shake the dish to agitate the liquid every 10 minutes or so. This helps to get rid of air bubbles and makes for a smoother etch. You can try not agitating it to see the different results. After an hour the resist will start to break to down, especially fine lines, so I rarely leave it in longer than that. Once it's done I carefully remove the brass and rinse it, then I scrub the resist off with Penny Brite and my sandpaper.

The end result

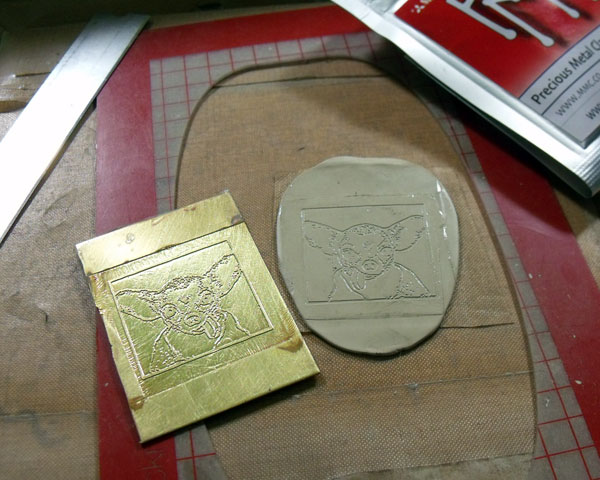
Here's my newly etched sheet and the finished piece.

Thursday, October 7, 2010

What's old is new again


I've been trying to come up with a frog design for quite some time now, with no success. Then a few days ago I came across a necklace that I did waaaaaaay back in the early nineties that had a frog and a couple of snakes. I was working in wax and casting it myself back in those days. I liked the frog and one of the snakes so much that I decided to make them both. The larger piece on the left in both photos is the original casting. Silver cost around $3 an ounce then, it's currently $22 or so! The green dots are concrete.

Wednesday, October 6, 2010

New Tools!


Last year September was pretty slow for me, but not so this year! It was actually my best month so far this year, so I decided to get some tools that will help me during the holiday crunch. Above and below is my new magnetic tumbler. Even though I do a matte or brushed finish on all my work, I like to tumble it first and make it shiny, which leads to a nicer brushed finish (in my opinion anyway). I have a regular rotary tumbler with stainless steel shot, but it takes at least2 hours and is pretty noisy. This little beauty uses magnets to move stainless steel pins around the barrel. It takes about half an hour or so, and I should be able to do 20-30 pieces at a time. It was pretty expensive but I think it will be well worth it.


While I was shopping for the tumbler, I noticed flex shafts on sale and since this one has a quick release instead of a regular chuck I decided to get it too. I've been using a dremel, but with a foot petal this is so much nicer! I got both of these at Otto Frei, which is located in Oakland California. Their selection is on par with Rio Grande, and both these things were on sale so the prices were better too.


Sunday, August 15, 2010

Drawing just for the fun of it

I draw all the time in the design and making of my jewelry, but it's been years since I've drawn just for the enjoyment of it. I recently discovered Zentangle, which is a structured doodling method which results in pleasing little drawings. I gave it a try, and remembered how much I love drawing in ink. I've moved away from the Zentangle format a bit, instead re-visiting the themes I used to draw, since I like to draw critters and such, not just pure abstraction.

Drawing with ink on paper is a good challenge because there is no erasing! I start off with a basic subject, like the rhino, beetles or mushrooms, sketch it out very roughly in pencil and then in ink, and do the rest in ink only, with no plan. I have no idea what will fill the rest of the page after the main subject is inked in. I use this small square sketchbook, which has very high quality, thick paper that the ink doesn't soak through.


Inevitably I add things I don't like, so then I have to figure out what to do about it. That's the biggest challenge, and my only rule is that I have to finish each one that I start. I may not love it when it's done, but no starting a new drawing until the last one is complete. Drawing without a plan is also new to me, I used to have it all laid out and would then would ink over the pencil, but I'm finding that I'm quite enjoying not knowing how it will turn out. If you want to know more about Zentangles you can check out the web site : http://zentangle.com/

Tuesday, August 3, 2010

Amazing show!

My first Renegade was quite an amazing and exhausting experience. I don't really keep much finished stock on hand, since I do this full time I pretty much make it as I need it. But of course for this I needed lots of finished pieces, so I worked very long hours in the weeks leading up to have some inventory to take with. Then I had to get the displays made and figure out all the many details. Thankfully my sister came down from Mt. Shasta on Thursday and helped out, and worked the show with me all weekend. There's no way I could have done it with out her!


Here's what the booth ended up looking like. For the displays I bought 20 gauge aluminum sheet cut to size and a $40 bending brake from Harbor Freight. My boyfriend Kelly's sister Laura (who is also my housemate and bookkeeper) did the bending for me, I added the paper for contrast and hooks made from aluminum wire on the back to hold the jewelry (bending of 130 hooks courtesy of my sister Colette).


Here I am, hoping that I'm getting all the credit card info that I'm supposed to be getting!


A shot of the crowd. There was a huge stream of people the entire weekend. This was taken during a quiet moment.


Here's my friend and fellow metal clay artist Christine from Chocolate and Steel, who came up from LA to do the show. She does tons of these shows, and is currently 6 months pregnant. She's amazing!


Most importantly, here's our coffee making set up at the motel. Good coffee is not optional, it is a necessity!

It ended up being a very successful weekend, both in terms of sales and in meeting lots of people and seeing old friends. I learned a lot and took notes about what to do differently next time, but it all went very smoothly for my first show. Now I'm working on custom orders, a big wholesale order, and catching up on my sleep!

Friday, July 30, 2010

Renegade Craft Fair San Francisco


I'm booth number 182 - please stop by and say hello if you come to the fair!
Here are all the details: http://www.renegadecraft.com/san-francisco

Tuesday, July 27, 2010

Getting ready for Renegade SF


I've been working really long hours the last few weeks getting ready for the Renegade Craft Fair in San Francisco this weekend. The jewelry will hopefully be all done tonight, then there's the displays to make and about a million other details! This is my first show ever, so it's been quite a bit of work getting everything together. If you're in the San Francisco area, do come by and and say hi. It's quite an amazing show. Here's the details: http://www.renegadecraft.com/san-francisco
Back to work now!

Wednesday, June 30, 2010

Edgar update


Edgar made it through the night, and after giving him a little breakfast I took him to the Sonoma county bird rescue center, where he is now in very capable hands. The best part is that they got another baby crow in yesterday who is about the same age, so he'll have company while he's there. You can really see his blue eyes in this photo, and that stuff on his beak is the baby bird food I was feeding him with an eyedropper.

Tuesday, June 29, 2010

Edgar Allen Crow


We have lots of crows in my neighborhood, and there are several nests in trees in the neighbors yards. Little Edgar here must have fallen out and ended up in our back yard. With all the dogs and cats here it's amazing that he is unharmed. He's got feathers but can't fly yet, and the nests are too high up to put him back, so I brought him inside. He just sat in my hand and let me feed him some baby bird food that we had left over from when the budgies had babies. I was a wildlife rescue volunteer years ago so I've fed more than a few baby birds. The parents were frantically calling and flying around, but now that it's dark they've quieted down. It's heartbreaking to hear them, but I will be taking Edgar to the Sonoma County Bird Rescue Center first thing in the morning, where he will get taken care of and released.

Sunday, June 27, 2010

New stuff!

Here's some of the pieces from the latest batch of etching shown on the last post.

Friday, June 25, 2010

Etch-o-rama

Art work in Adobe Illustrator ready to be printed on to PNP paper and transferred to brass sheets

The etched brass plates

This last couple of months have been crazy busy for me, but I'm finally starting to get caught up on my very long to do list. Yesterday I went wild the etching, and did plates for 5 new designs in 2 sizes each, as well as a couple of custom pet pieces. The first photo shows my illustrations, all sized and ready to print on to to the PNP transfer paper. Thanks to my spiffy "professional" clothes iron, which does not have automatic shut-off, I was able to get all my images transferred to prepared brass plates without much trouble. This used to be the worst part of the whole procedure - having an iron that shut itself off every 5 minutes made it very difficult to do the transfer process more than one at a time. I was forever waiting for the iron to heat up again. I should have some finished pieces to show in the next day or two.

Monday, May 31, 2010

What I did with my day off


Here's some pieces I made while messing around with the rough diamonds. I was experimenting with different ways of setting them, since they did change color in the kiln. The bezel is the easiest to work with I think, and the best part was when I realized that I didn't have to wait and order some tomorrow, I could just make my own! Metal clay is fun that way. Back to my regularly scheduled work now.